

I have had a dream of running Linux on the desktop in a business environment for a long time.
Linux and the Free Open Source Software (FOSS) tool chains that it supports are a staple for many IT professionals. They are widely used for IT heavy lifting tasks such as Web development, data science, system administration and penetration testing.
A number of Linux based operating systems such as Google’s Android and Chrome OS, or Valve’s Linux / SteamOS have been highly successful in specific markets. Linux is the dominant operating system for high performance computing, and a major player in cloud and corporate datacentres.
And yet, The Year of Linux on the Desktop is more of a running gag at this point.
The key challenge with Linux on a business desktop is that most business environments run on a Windows ecosystem that is not friendly to Linux. There are gaps in support for many enterprise grade products that make it difficult to integrate Linux workstations.
This is largely an issue of scale. Why would organisations invest in support for Linux when it has so little a share of the desktop?
One common way for IT professionals to solve this problem is to use virtualisation or containerisation tools to run Linux under Windows. Where frequent access is required, Apple Macs are often used as a development workstation as they provide access to both a UNIX based environment and the Microsoft tools and drivers required for integration with enterprise Windows ecosystems.
With the introduction of the Windows Subsystem for Linux, an alternative is available.
A Native Linux IT workbench for Windows
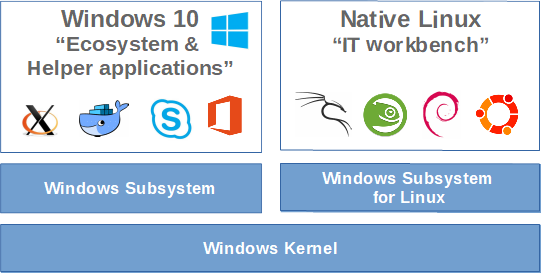
The Windows Subsystem for Linux (WSL) is a Windows 10 feature that allows you run Linux programs directly on the Windows Kernel. Native Linux applications run alongside Windows applications. The two operating systems share resources and can communicate with each other.
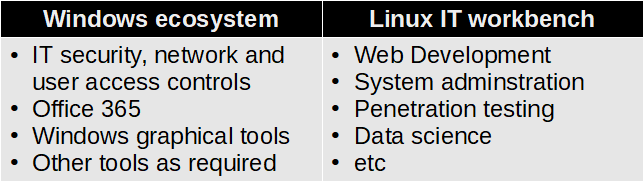
The ability to both integrate with the Windows ecosystem and access to tools from native Linux distributions allows you to create a Linux IT workbench within a Windows environment.
WSL provides a lightweight alternative to Linux virtual machines or containerisation. It can replace a collection of Windows add-ons such as PuTTY and MinGW, and can avoid compatibility issues with Linux tools that have been ported to Windows.
This is primarily a tool for developers, especially web developers and those who work on or with open source projects. This allows those who want/need to use Bash, common Linux tools and many Linux-first tools (Ruby, Python, etc.), to use their tool chain on Windows.
Most likely this will require changes to workplace IT network and security solutions to support WSL integration into existing firewall and AV configuration, and to provide secure access to Linux distributions.
Rampant speculation
There is plenty of speculation about this product.
Clearly Microsoft are encouraging the migration of applications and development from Linux to Windows. This is similar to the approach they used to enable application migration from OS2 to Windows.
This feels a little like the famed Embrace, Extend, Exterminate strategy. The ability to mix and match Linux and Windows commands in the one command line, or to combine Microsoft tools such as Visual Studio with Linux utilities, will create blended tool chains that only work on Windows desktops.
There are several Linux features that Microsoft does not plan to implement under WSL. For example Microsoft do not plan to support Linux GUI desktops or applications, and they provide alternative solutions for containerisation and virtualisation of Linux workloads. Applications that provide their own Linux kernel extensions, or require direct access to the hardware will not run natively under WSL (for example Docker).
Will this create a market for “helper” applications that bridge the gaps, or encourage migration of these tools from Linux to a Windows based development?
The future Windows direction of FOSS products are less clear. Will there still be a need for Windows ports such as MinGW or tools like PuTTY when you can run the native Linux equivalents inside of WSL? Alternately, which FOSS products will still require Windows ports to overcome gaps in WSL capabilities?
Does this undermine the need for Apple Macs as a developer workstation?
Who knows? Perhaps this will be the Year of Linux on the (Windows) desktop!
Further reading and things to try.
Microsoft resources
- Where to start learning about the Windows Subsystem for Linux: https://docs.microsoft.com/en-us/windows/wsl/about. Contains the WSL installation guide, FAQ, troubleshooting and release notes.
- Windows Subsystem for Linux Overview: https://blogs.msdn.microsoft.com/wsl/2016/04/22/windows-subsystem-for-linux-overview/. For people who are interested in the history of the Windows subsystem feature, and the architecture of the WSL.
More detail on Pico processes, the sandbox that hosts Linux processes in WSL: https://blogs.msdn.microsoft.com/wsl/2016/05/23/pico-process-overview/
- Extensions to provide AV and Firewall integration with WSL. https://blogs.msdn.microsoft.com/wsl/2016/11/01/wsl-antivirus-and-firewall-compatibility/
Other resources
- The most “Awesome list dedicated to the Windows Subsystem for Linux” can be found at https://github.com/sirredbeard/Awesome-WSL. This includes information on how to setup WSL; a list of official and unofficial (eg Fedora) distributions; How to integrate with Ansible, Azure, Docker, etc; Running X servers and Linux desktops (Gnome, Xfce, Kde).
- How to install a LAMP stack on WSL: https://medium.com/@ssharizal/how-to-install-lamp-stack-server-on-windows-subsystem-linux-wsl-windows-10-133419c22473
- How to run xfce4 on Kali Linux over WSL using the remote desktop protocol: https://youtu.be/wIH-bwdWRGM
- Adding rules to Windows Defender to allow Kali Linux to install penetration testing tools: https://www.simontaplin.net/configuring-windows-defender-e/.

 One happily working gadget